File Systems: File Managers and Basic File Manipulation Operations
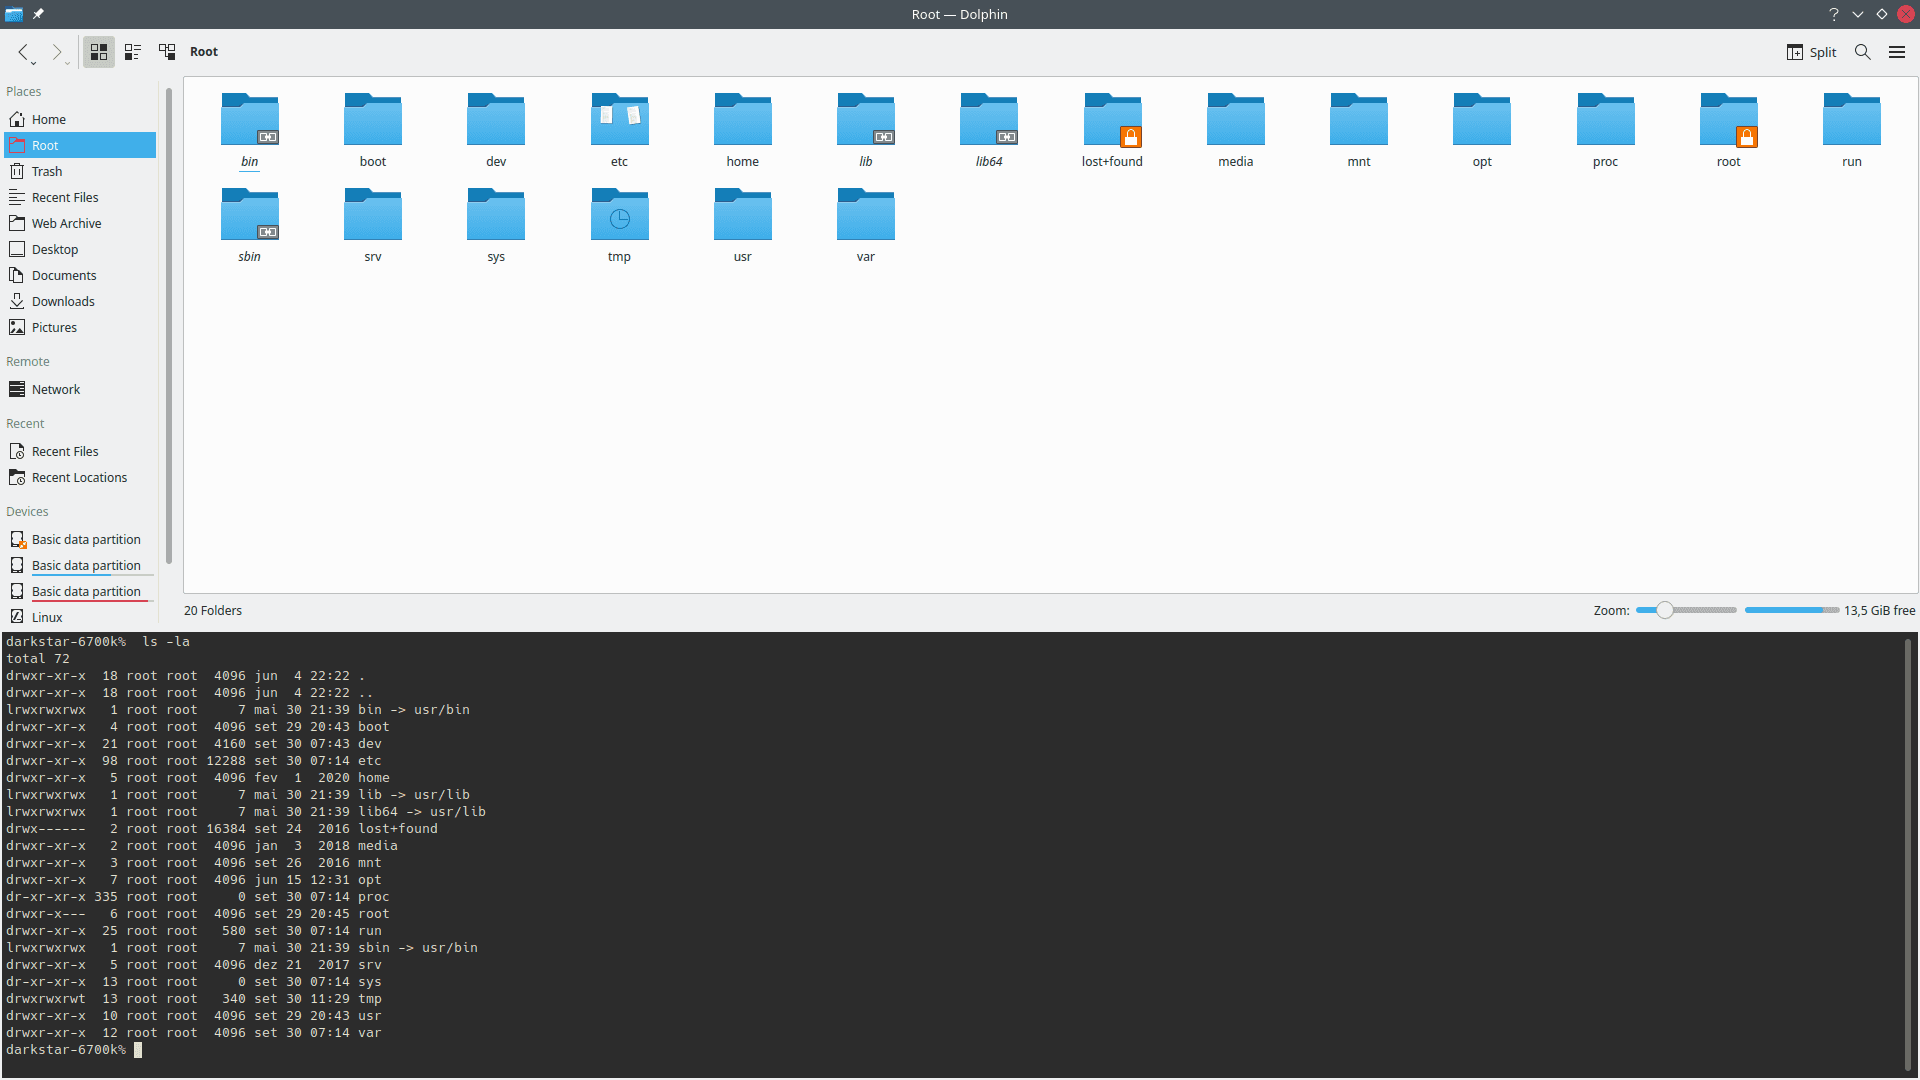
Image credits: Image created by the author using the program Spectacle.
File Management Using the Graphical User Interface
It is useful to know how to operate file management systems (what is that? Check out an introduction). In practice, basic file management skills appear to have disappeared along digital systems' evolution. It is good to know, at least, the bare minimum, such as skills to:
- Create folders (directories);
- Create empty files ("blank" files);
- Rename folders and files;
- Move folders e files;
- Remove (delete) folders and files (including move files to trash and emptying it, and delete files permanently).
Although these concepts also apply to mobile devices, programming and software development activities to tend to be more effective on desktop computers or laptops. Therefore, the terminology adopted on the following sections assume the use of computers. If you would rather perform the actions on mobile devices, please consider reading the following terms as:
- Left button as touching followed by releasing the screen;
- Right button or context menu as a long press and hold, that is, keeping the screen pressed without it for a few seconds without releasing it.
Important
When you are learning to use the command line and file managers, it is wise to perform commands in a folder created for this purpose, with placeholder content tailored to the learning. Some operations (such as removing files) are not always reversible, depending on interpreter, program and/or operating system.
Therefore, it is important to take care to avoid data loss. The author has no responsibility for loss of data caused by the action of the reader over her/his files. You should always have back-ups of important files and should never use files that you are not willing to lose.
Concepts and Operations
A mouse is the default input device for graphical environment. Mouse is a metaphor to the format of the device and the wire. Metaphors are commonly used in the design of user interfaces. On this section, you may notice other metaphors used by file managers -- in fact, files and folders are metaphors themselves.
Mice with two buttons assume a default configuration for right-handed people. Although it is possible to reverse the settings, it does not seem to be very common. Rather, left-handed people often learn to use the mouse with their right hand. Nevertheless, considering the right-handed layout:
The main purpose of left mouse button (from here on, left button) is choosing an option or an action to perform. Often, an action depends on a context defined by a selection, which appoints an interface element that will receive the action (it will be the focus of the action). There are two main approaches to appoint an operation: selection by click or selection by (hovering) focus (i.e., leaving the mouse cursor -- the pointing arrow -- over an element).
In selection by click, a first click set the focus on an interface element (for instance, a graphical icon). The second click (or a fast double quick, to select and execute at once) performs the primary action associated to the element (for instance, open a file with the associated program or list the contents of a folder). Selection by click is common on Windows environments. It is also common to switch the use of input devices. For instance, the first click on a text box defines the focus over it, which enables writing text inside it (for example, using a keyboard).
In selection by focus, a selection results from hovering (and leaving) the mouse cursor over the desired element. Once an element has the focus, the first (and single) click performs the primary action. Selection by focus is common on Web systems. For instance, to access a hyperlink, it is first necessary to hover the mouse cursor over it, then perform a single click.
The right mouse button (hereafter, right button) provides a context menu (a list of options and actions), with related actions that are secondary to manipulating (using) a user interface element. To choose one among the available choices, you should use the left button. Thus, the right button is used only to open the menu.
A context menu, as the name suggests, depends on the context of the action. For instance, if the primary action is open, secondary actions may include:
- Open with: choose a program to manipulate the file (read, write, modify);
- Copy: add the file to the transfer area, which enable the option to paste it on destination, performing the copy;
- Cut: a shortcut to copy the file and, after pasting it, deleting the original one (in other words, only the copy exists afterwards);
- Duplicate: shortcut to copy and paste the file on the same directory (with a new name);
- Rename: change the name of the file;
- Move: change the directory (folder) on which the file is stored;
- Delete or remove or move to trash (bin/can): remove the file from the directory. When a file is moved to the trash (bin/can), it still exists in the computer. To remove it permanently, you must empty the trash (bin/can);
- Delete permanently: remove the file definitely, without sending it to the trash (bin/can). It is the same as moving a file to the trash (bin/can), then emptying it.
- Show properties: show metadata about the file.
A click on an empty space can have different possible actions. They can include:
- Create a new folder: create a subdirectory that is a child of the current one;
- Create file: create an empty file, optionally using a model or template;
- Sort: set some criteria for displaying the contents of a directory with some order;
- View mode: choosing a way to graphically display the contents of a folder (for instance, text lists, icons or thumbnails).
The previous actions are common in programming activities. Therefore, it is useful to know how to perform them.
Common Shortcuts for File Managers
In particular, it is also useful to know the shortcuts for the main features of a file manager. In general, modern applications follow guidelines for interaction called Common User Access (CUA). CUA allows standardizing actions and shortcuts on different programs.
For instance, the following keyboard keys usually are shortcuts to perform the respective actions quickly:
- Up (
↑), down (↓), left (←) and right (→) arrows: move the cursor one position towards the chosen direction; Tab,⇥or⇄: move the focus to the next available element;Enter,Return,⏎or⎆: performs the primary action or confirm the action;EscorEscape: cancel the action;DelorDelete: delete a file or folder;Home: move the cursor to the first file or folder of a list;End: move the cursor to the last element;PgUporPage Up: move one page above;PgDnorPage Down: move one page below;Backspaceor⃪(a longer arrow than the left one): returns to the last visited directory;F1: shows help;F2: rename file or folder;F5: refresh the contents of a directory, i.e., reloads the content to show existing files and folders after changes (such as rename and creation operations);F11: maximize the open window (shows it on the entire screen);Super,❖,⌥or Windows logo key: open the main menu of the operating system;Cmd,Commandor⌘: key used for commands in Mac platforms. Often, it is similar toCtrl, described next.
There also exist modifier keys. To use a modifier key, you should hold it, then press the remaining of a combination. Some of most common include:
Ctrlor⎈: operations over sets of files.Ctrlmust be hold while the corresponding key is pressed to perform the action:Ctrl c: copy the selected element(s);Ctrl p: paste the selected element(s);Ctrl x: cut the selected elements(s);Ctrl z: undo the last performed action (provided it is possible);Ctrl f: open the search feature;Ctrl n: open a new window;Ctrl w: close the current window;Ctrl t: open a new tab (this is not a feature of all file managers);Ctrl w: close the current tab (when it is possible to open tabs);Ctrl a: select all files and folders of the current directory;Ctrl Left Button: multiple file selection.Ctrlmust be pressed from the start to the end. If a non-highlighted file or folder is clicked, it is added to the selected elements. If a highlighting element is pressed, it is removed from the selected elements;Ctrl Enter: perform the primary action on all selected elements. When there exists a selection, onlyEnteris also accepted;Ctrl Right Button: open the menu the context then performs the chosen action on all selected items.
Shiftor⇑: alternative actions (usually the inverse or reverse of the primary one):Shift Tab: move the focus to the previous element;Shift Del: remove file permanently, without sending it to the trash (bin/can);Shift Left Button: select all elements between the last selected and the newly selected one.
Altor⇬: alternate actions:Alt d: select the address bar of the file manager;Alt F4: close the active window;Alt Left Arrow: return to the previous directory;Alt Right Arrow: forwards to the next directory (of the history);Alt Up Arrow: return to the parent directory.
Super,❖,⌥or Windows logo key:Super: open the initial menu of the operating system;Super e: open the file manager;Super dor❖ m: show the desktop or minimize all wiindows;Super Left Arrow: fix the window on the left side of the screen;Super Right Arrow: fix the window on the right side of the screen;Super Up Arrow: maximize the window;Super Down Arrow: minimize the window;Super Shift Left Arrow: move the window to the screen to the left (if there are multiple);Super Shift Right Arrow: move the window to the screen to the right (if there are multiple).
Clearly, it is not necessary to memorize all combinations, though it is useful to incorporate their usage on daily activities. In particular, some shortcuts are exactly the same on different programs -- thus, some combinations can perform the same actions on multiple programs.
Windows: File Explorer (Formerly Windows Explorer) is the Default File Manager
The File Explorer (Windows 10) or Windows Explorer (previous versions) is the
default file manager on Windows. Perhaps that the fastest way to run it with the
shortcut using the Windows logo key (Super): ❖ e. Other options include
typing explorer in the Start menu or run the program with Super r, followed
by explorer, followed by Enter. File Explorer has the essential operations
for file management; nothing more than that.
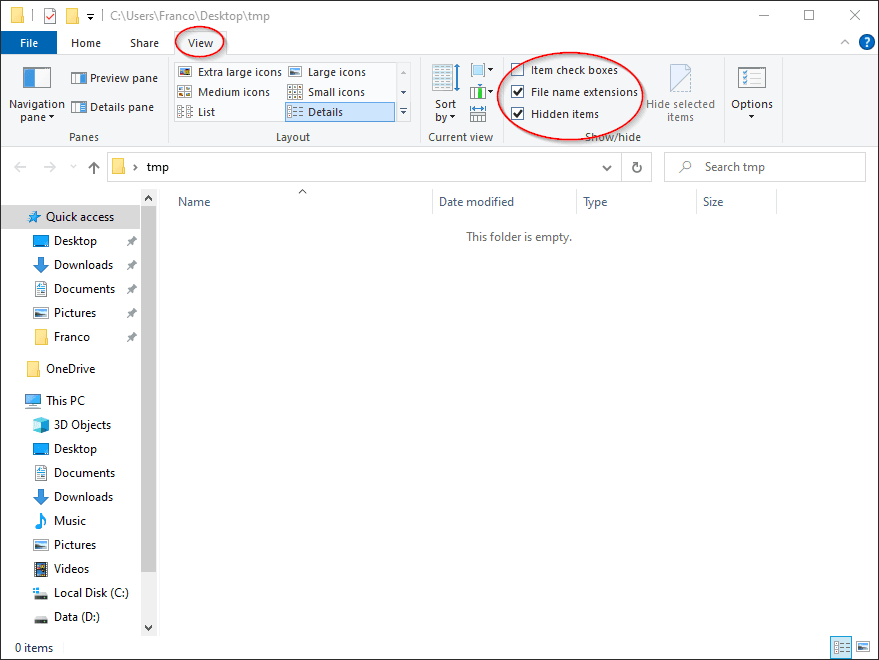
For programming and software development activities, it can be useful to enable
the options to show file extensions and show hidden files. To enable them, click
on View, then check the boxes File name extensions and Hidden items.
For an example of file management operations with File Explorer, we can consider the following sequence of actions.
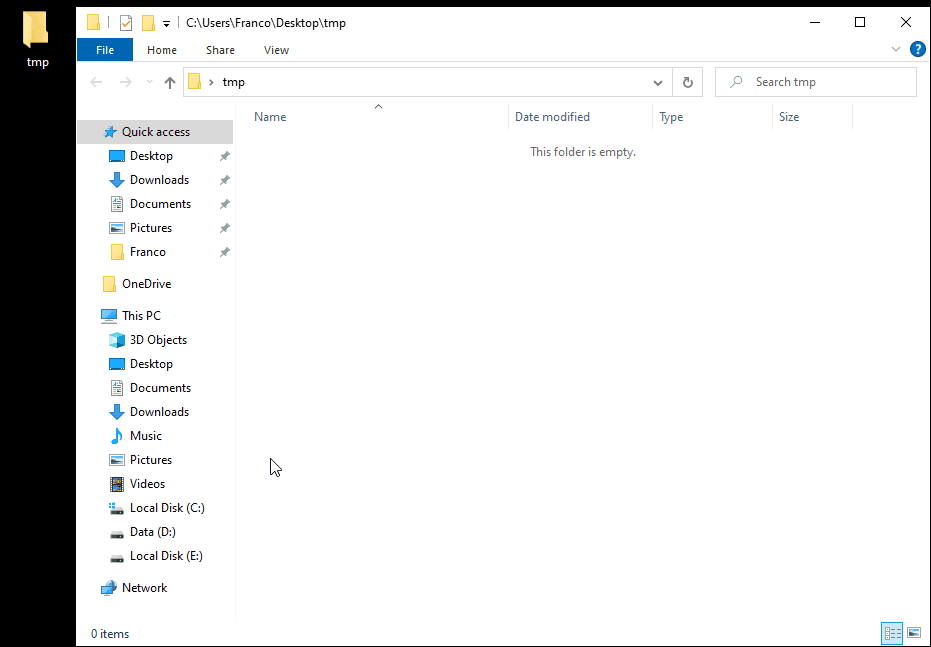
Start at any directory. In this example, the initial address is the absolute path
C:\Users\Franco\Desktop\tmp; in other words, a folder calledtmpcreated on the desktop (the default background screen that appears after logging in the computer or accessing an account). The absolute path is displayed at the title of the window. The address bar in File Explorer shows the current address (at times, a relative path).![The image shows an empty folder as displayed by the File Explorer.]()
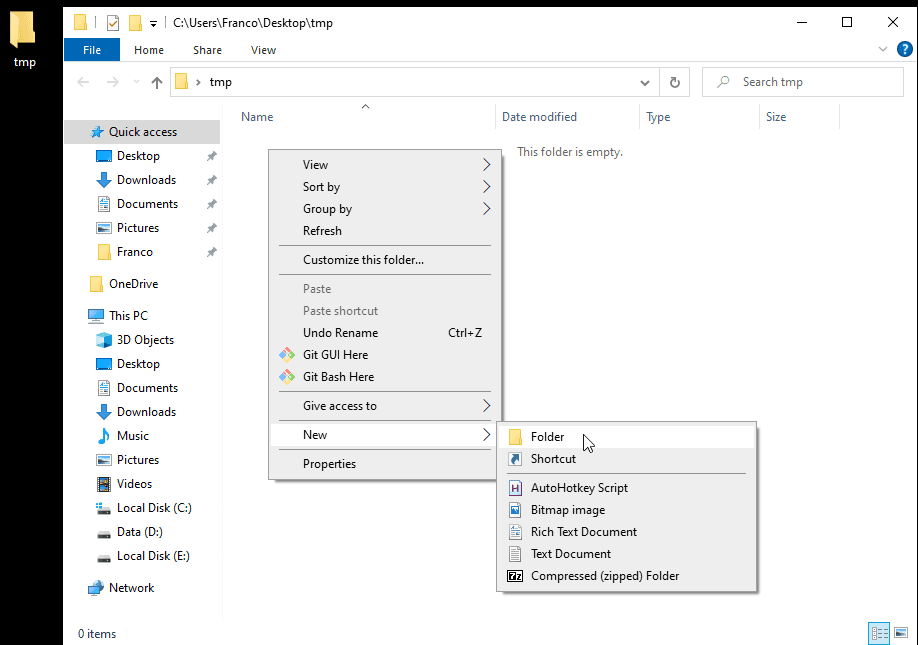
Press the right button of the mouse in an empty space of the window to open the context menu. Choose the option create new folder.
![After clicking the right button, a context menu appears. In the image, the option to create a new folder is focused.]()
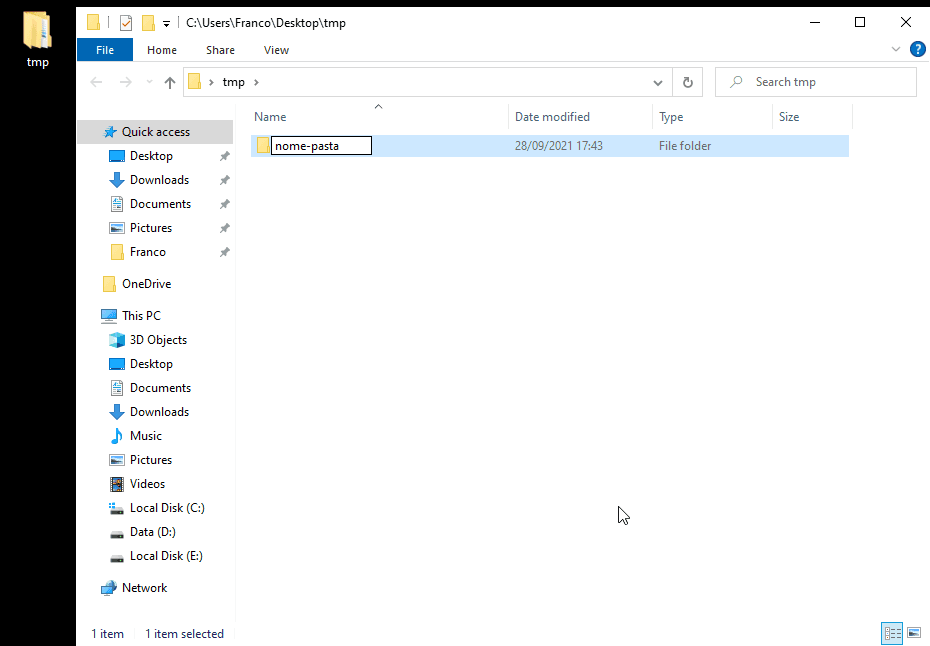
Choose a name for the new folder (
nome-pasta) and confirm the creation by pressingEnter. A new folder appears in the directory of the performed action. Its path isC:\Users\Franco\Desktop\tmp\nome-pasta.![The File Explorer interface to select and confirm a name to the new folder.]()
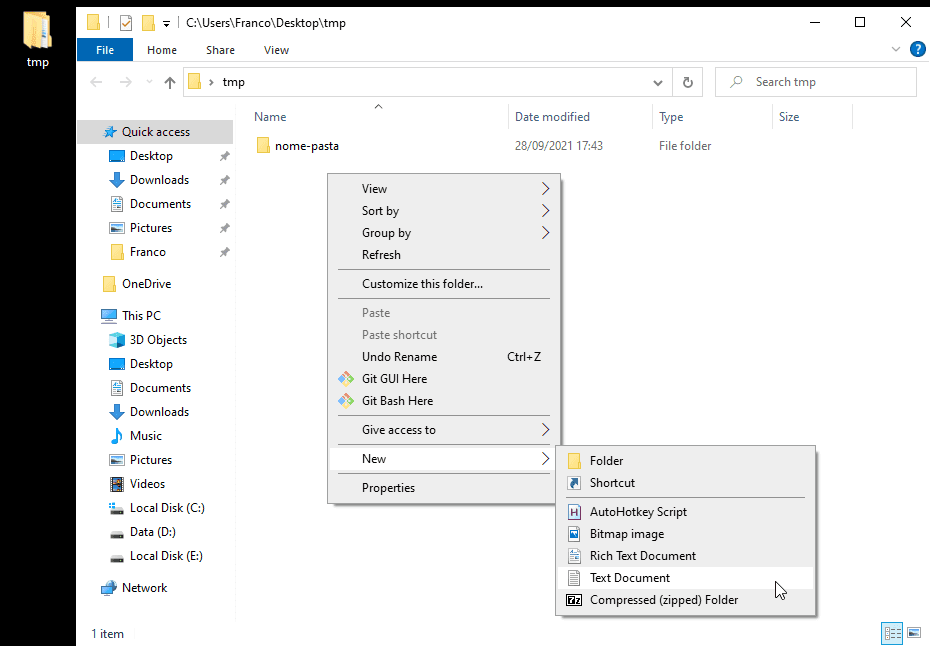
Next, open the context menu again with the right button. This time, create an empty text document (
.txtextension). The name does not matter for this example -- we can accept the default one.![Context menu displayed by File Explorer. The focused action is to create a new text file.]()
The resulting file path is
C:\Users\Franco\Desktop\tmp\New Text Document.txt. The relative path starting attmp\is.\New Text Document.txt-- or, simply,New Text Document.txt.When you create a new text file, you can change the extension of the view if you wish. This is particularly useful for programming, because you can choose the extension used by the programming language of your choice. For instance, to create a JavaScript file, you would name as
name.js(instead ofname.txt).namewould be the filename of your choice. For Python, the file name could bemy-file.py. For Lua,another_file.lua, and so on. If it is not possible to change the extension on Windows, ensure that the option to show file extensoins is enabled in theViewtab.Furthermore, if you need to change an extension for an existing file, you can rename a file and change the extension. The file contents will not be affected; one the filename will change.
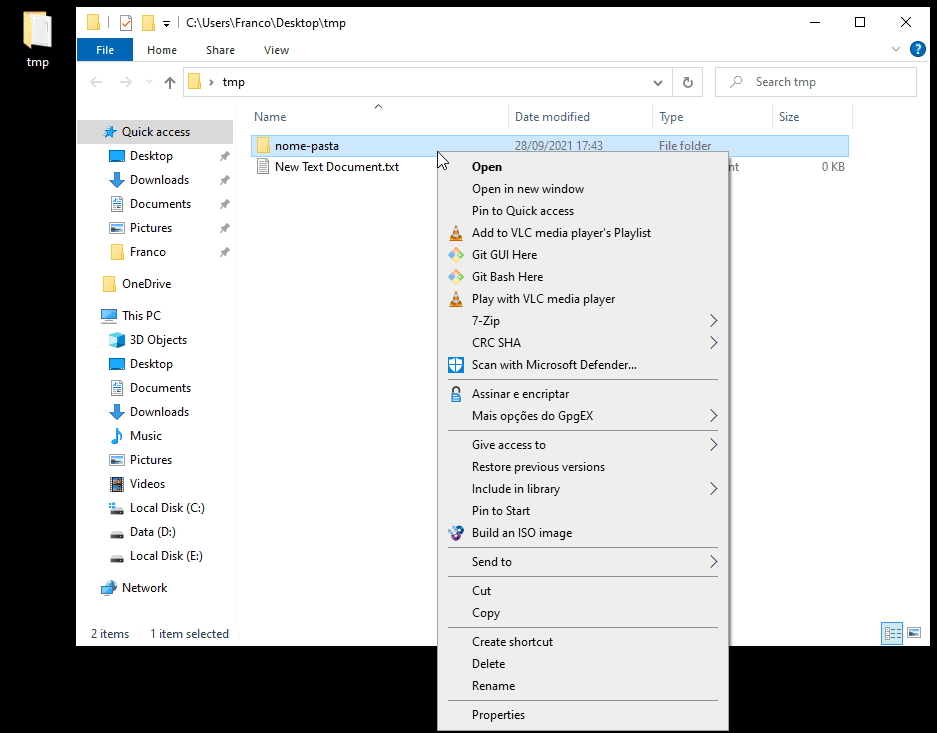
Click on the folder with the right button to display the context menu. It will show a list of available operations for the directory.
![File Explorer context menu for folders. Options include open in new window, copy, cut, rename, delete.]()
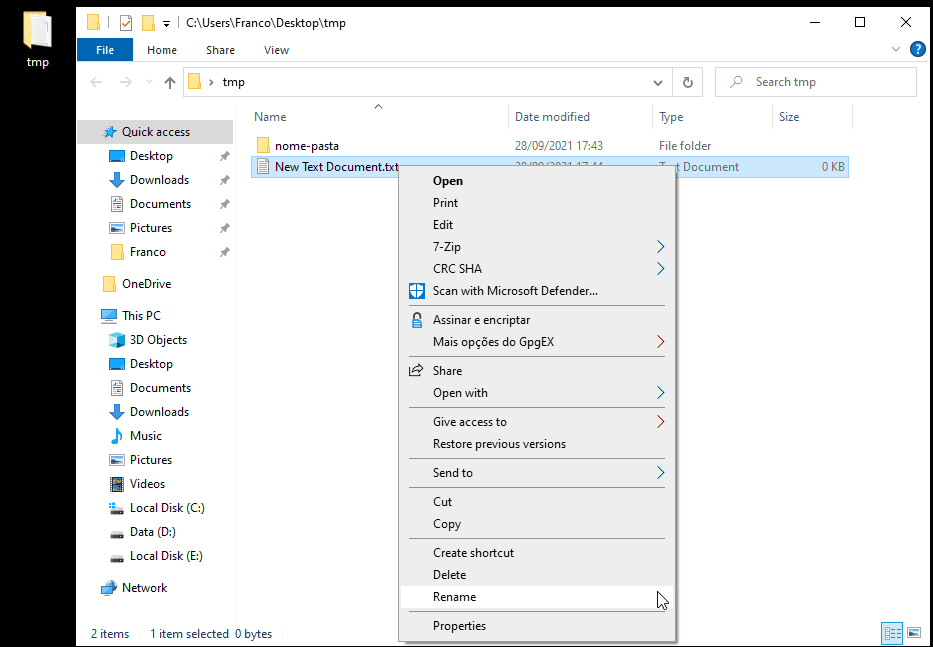
Click on the file with the right button. The list of actions is slightly different from the menu's one. In this case, the image highlights the option to rename files, which should be selected with the left button.
![The File Explorer context menu for text files. The option to open in a new window is replaced by open with a text editor called Notepad. The option that will be selected is renamed.]()
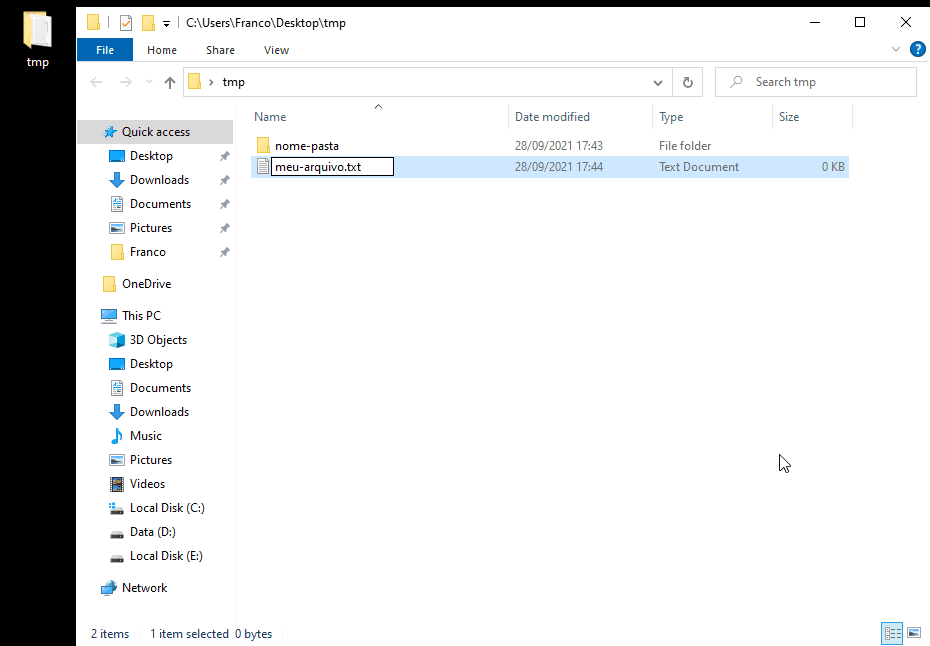
Choose a new name (
meu-arquivo.txt) for the file and pressEnterto confirm the change.![The interface to rename the chosen file with the new name (meu-arquivo.txt).]()
The resulting path for the file is
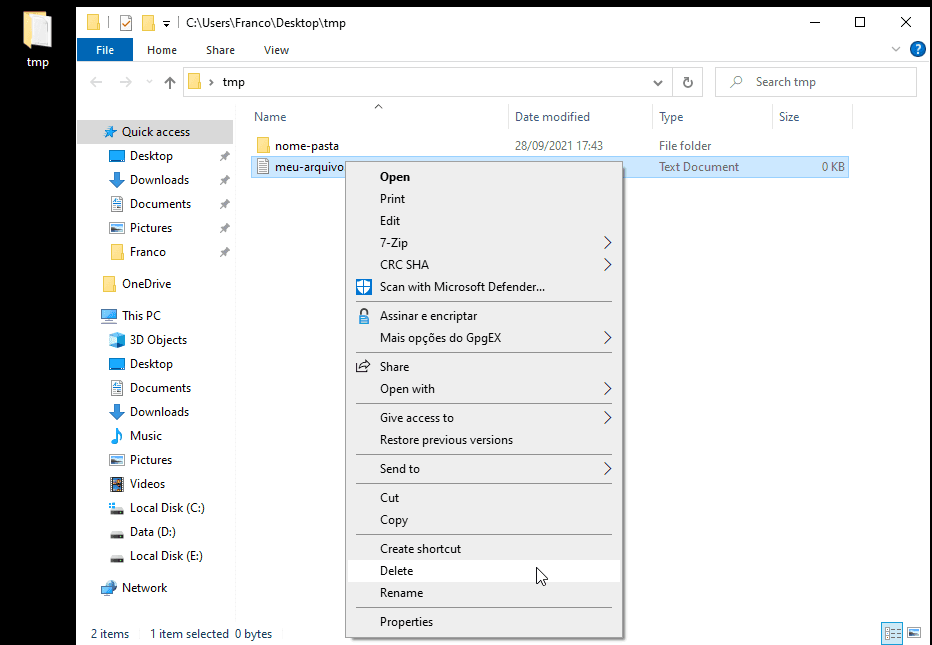
C:\Users\Franco\Desktop\tmp\meu-arquivo.txt. The relative path considering thetmp\directory is.\meu-arquivo.txt(corresponding tomeu-arquivo.txt).This time, open the context menu (with the right button) and click to delete the file, to move it to the trash (bin/can).
![The Explorer context menu with the option delete chosen.]()
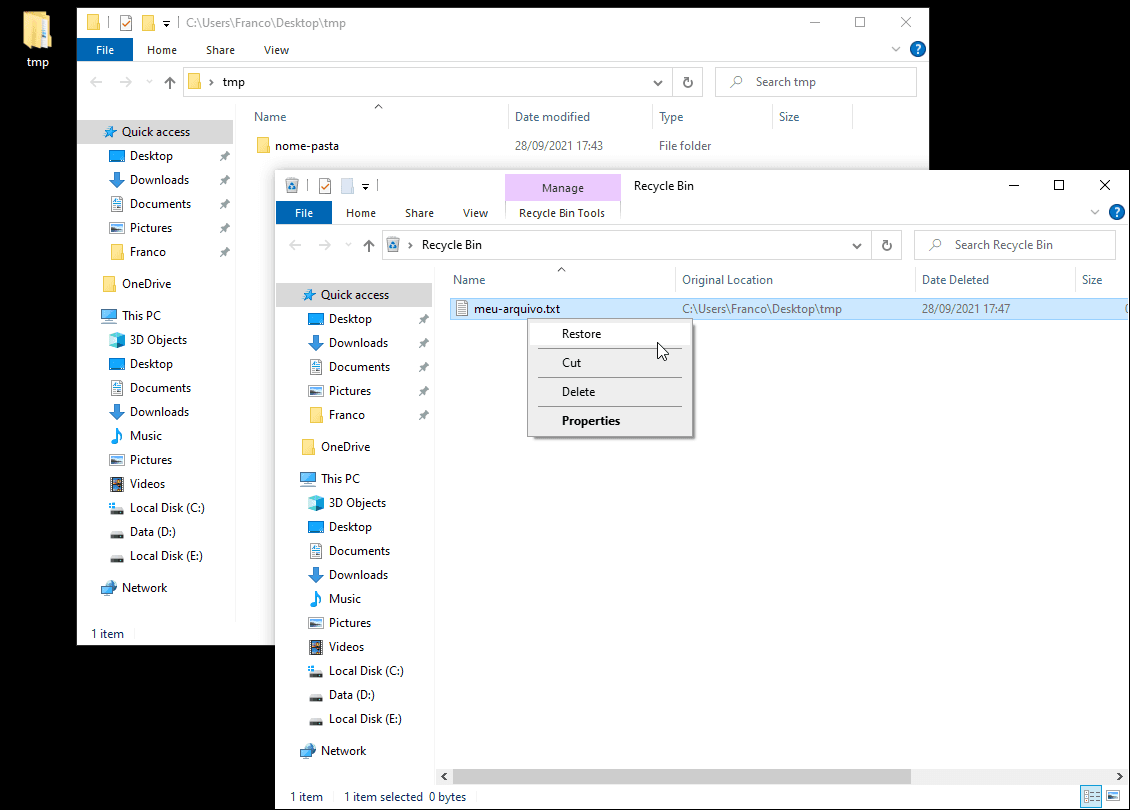
In the trash (bin/can), click with the right button to open the context menu, then click to restore the file. The file will return to the original directory, as if it had never been deleted.
![Two opened windows. The first shows the directory without the file, which is now inside the trash (bin/can). The second shows the trash (bin/can). In the context menu provided for the file in the trash, the restore option is focused.]()
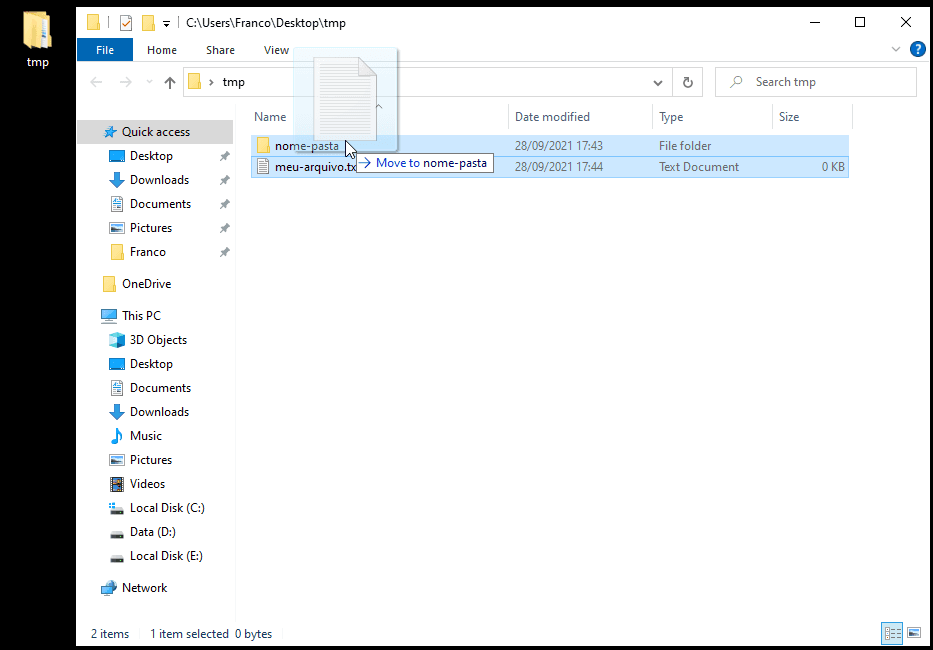
This time, press and hold the left button. Instead of releasing it, keep the button pressed and drag it around.
Hold the button and move it over the folder. Once it is hovering there, release the button.
![Drag and drop operation on File Explorer. The program creates a image of the file being dragged to the destination.]()
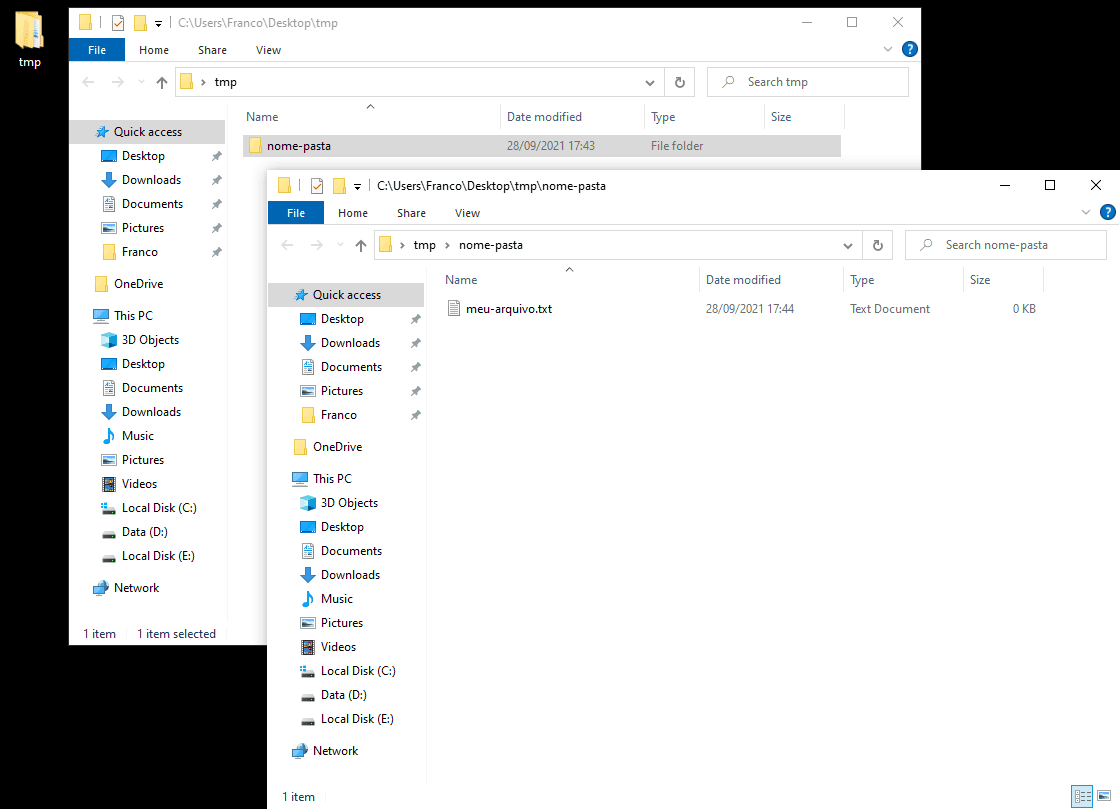
As a result, the file is moved inside the folder. It is now stored in the subdirectory
nome-pasta, with pathC:\Users\Franco\Desktop\tmp\nome-pasta\meu-arquivo.txt. The relative path to the foldertmp\becomes.\nome-pasta\meu-arquivo.txt(the same asnome-pasta\meu-arquivo.txt).![The original directory `tmp` and the subdirectory `nome-pasta` are shown on two windows. The file `meu-arquivo.txt`, now, appears the subdirectory, for it was moved there.]()
If you delete an entire folder, the files and folders stored inside it are deleted recursively. Consequently, the final state becomes the same as the starting one: an empty
nome-pastafolder.![The file manager display the folder `tmp` empty once again.]()
File operations are similar regardless of file manager. Clearly, programs with more features make complex tasks easier than those with fewer features. To illustrate the similarities, the next example do (almost) the same steps on a Linux system.
Linux: Check Your Distribution (or Install Your Favorite)
Linux distributions provide several high quality file managers in most desktop environments. Two traditional options are provided by the Gnome and KDE desktop environments: Dolphin and Files (formerly Nautilus). Besides KDE and Gnome, there are environments such as XFCE, Fluxbox and Unity. Personally, when I can choose, I like KDE as a Linux environment. The default KDE's programs have several interesting features. KDE's programs are like swiss army knives, full of features.
Besides Dolphin, KDE provides Krusader and Konqueror as alternatives. Krusader is a commander style manager, with two panels. Konqueror has multiple uses, also performing as Internet browser and file viewer. Dolphin is the default file manager, considered basic (although it hardly can be called so).
To illustrate file management operations with Dolphin, we can consider the following actions. Names of files can be identical or different. In particular, the main differences if compared to Windows will be the direction of slashes used to show file paths.
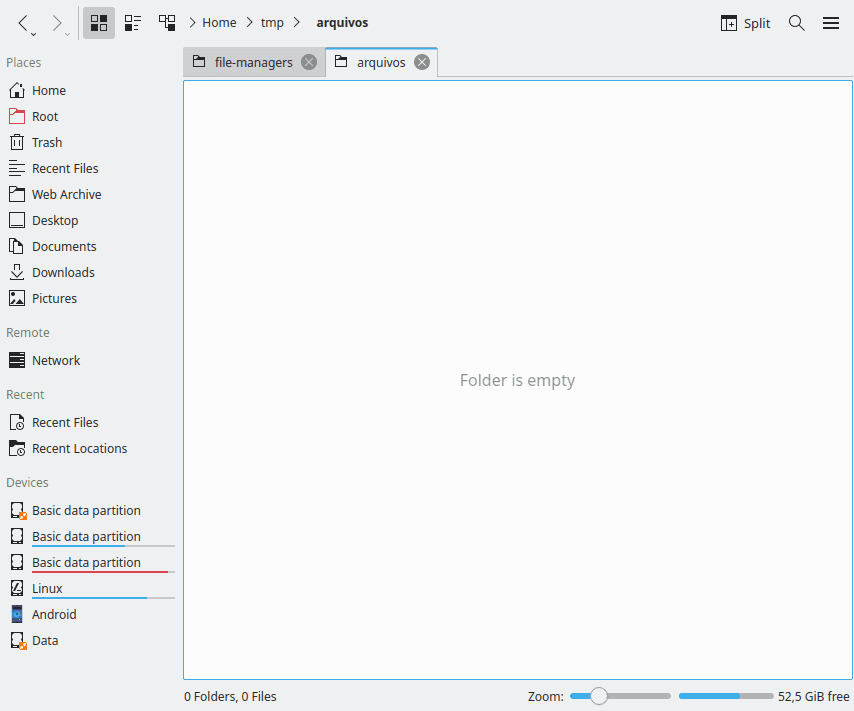
Start on any directory. In this example, the starting address is
Home > tmp > arquivos, with the path~/tmp/arquivos/. The character~(tilde) means the personal user directory (Home) in Linux systems. In this case, the absolute address would be/home/franco/tmp/arquivos/. The top part of Dolphin's user interface shows the absolute address -- to show it as text, you can click after the last letter of the name (in this case,Home > tmp > arquivos, you should click after thesinarquivos).![The image shows an empty folder as displayed by the Dolphin.]()
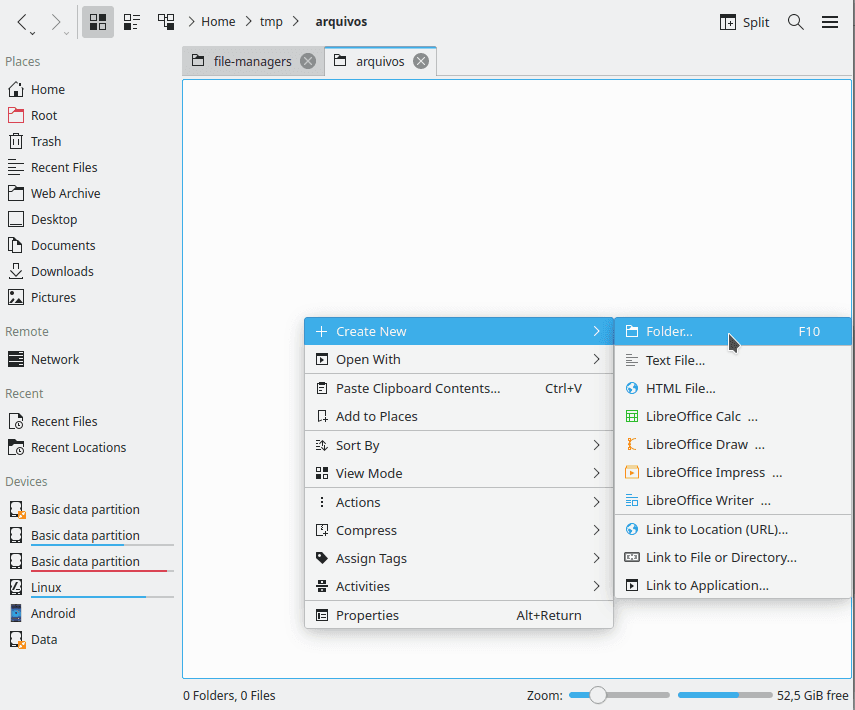
Press the right button of the mouse in an empty space of the window to open the context menu. Choose the option create new folder.
![After clicking the right button, a context menu appears. In the image, the option to create a new folder is focused.]()
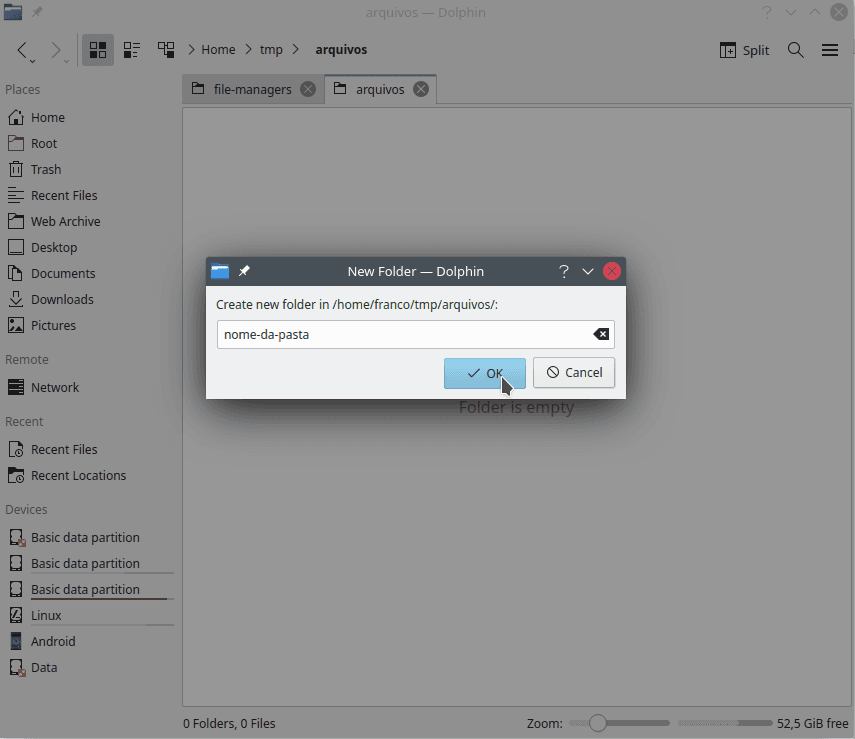
Choose a name for the new folder (
nome-da-pasta) and confirm the creation by pressingEnter. A new folder appears in the directory of the performed action. Its path~/tmp/arquivos/nome-da-pasta.![The Dolphin interface to select and confirm a name to the new folder.]()
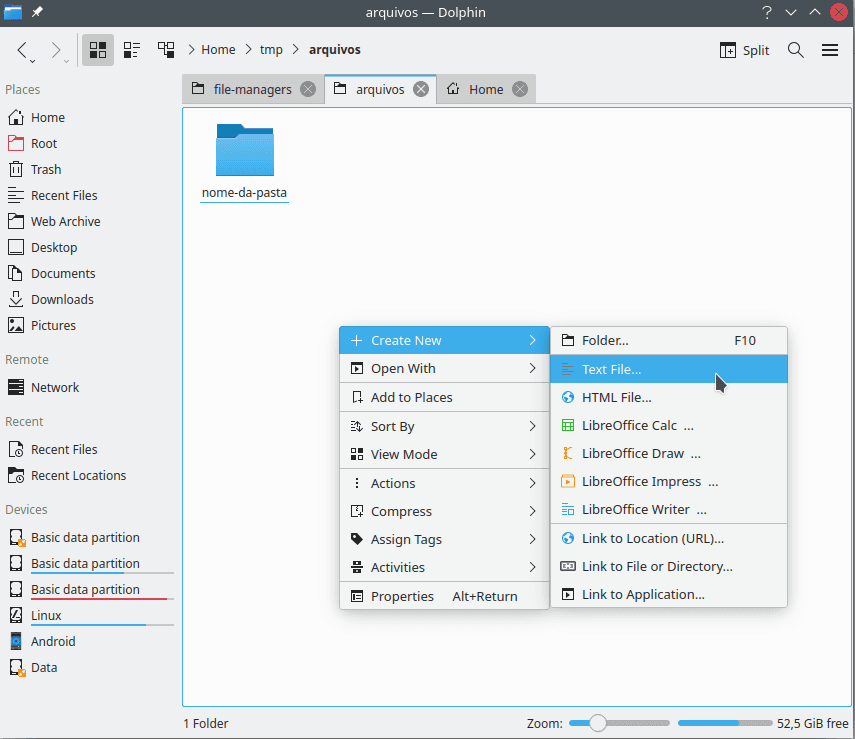
Next, open the context menu again with the right button. This time, create an empty text document (
.txtextension). The name does not matter for this example -- we can accept the default one.![Context menu displayed by Dolphin. The focused action is to create a new text file.]()
The resulting file path is
~/tmp/arquivos/Text File.txt. The relative path starting atarquivos/is./Text File.txt-- or, simply,Text File.txt.Like on Windows, you can choose the extension for a file during its creation. Using the same examples, you can create
name.js(instead ofname.txt) for JavaScript, For Python,my-file.pyfor Python,another_file.luafor Lua, and so on. You can also rename existing files to change the extension.Click on the folder with the right button to display the context menu. It will show a list of available operations for the directory.
![Dolphin context menu for folders. Options include open in new tab, open in new window, copy, cut, rename, delete.]()
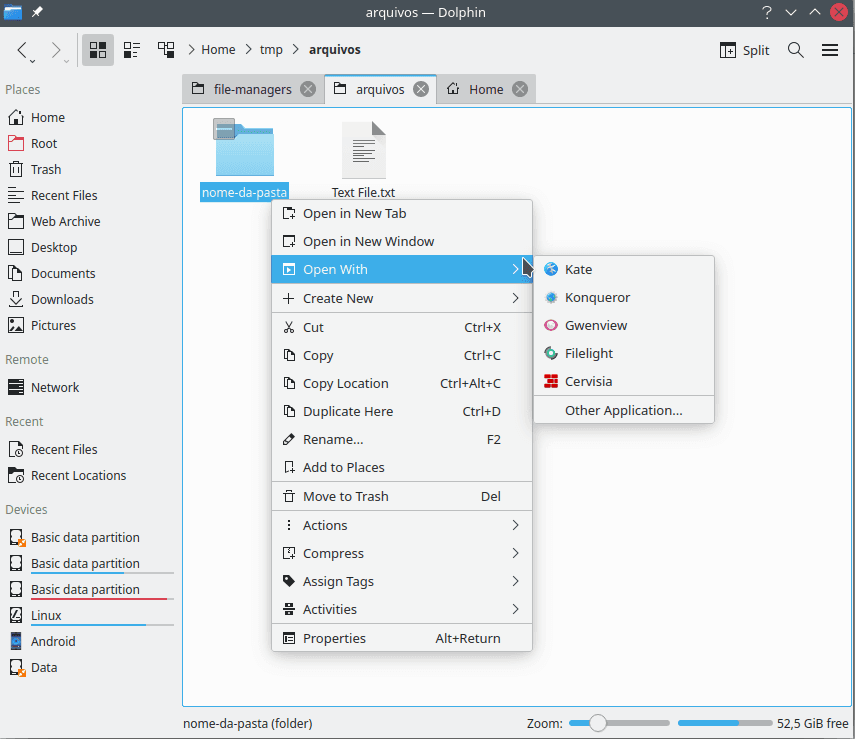
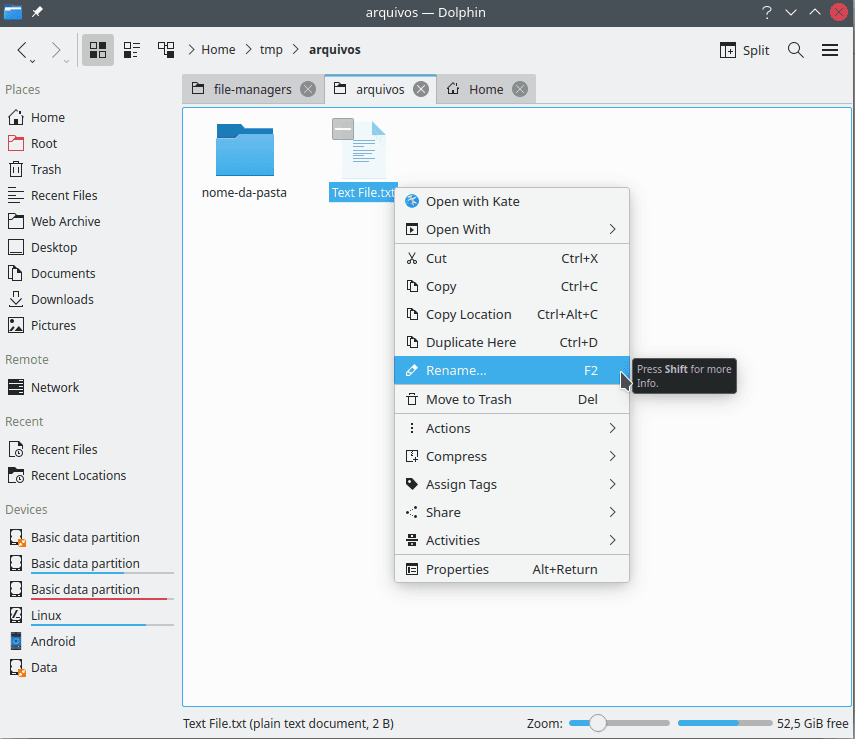
Click on the file with the right button. The list of actions is slightly different from the menu's one. In this case, the image highlights the option to rename files, which should be selected with the left button.
![The Dolphin context menu for text files. The option to open in a new window is replaced by open with a text editor called Kate. The option that will be selected is renamed.]()
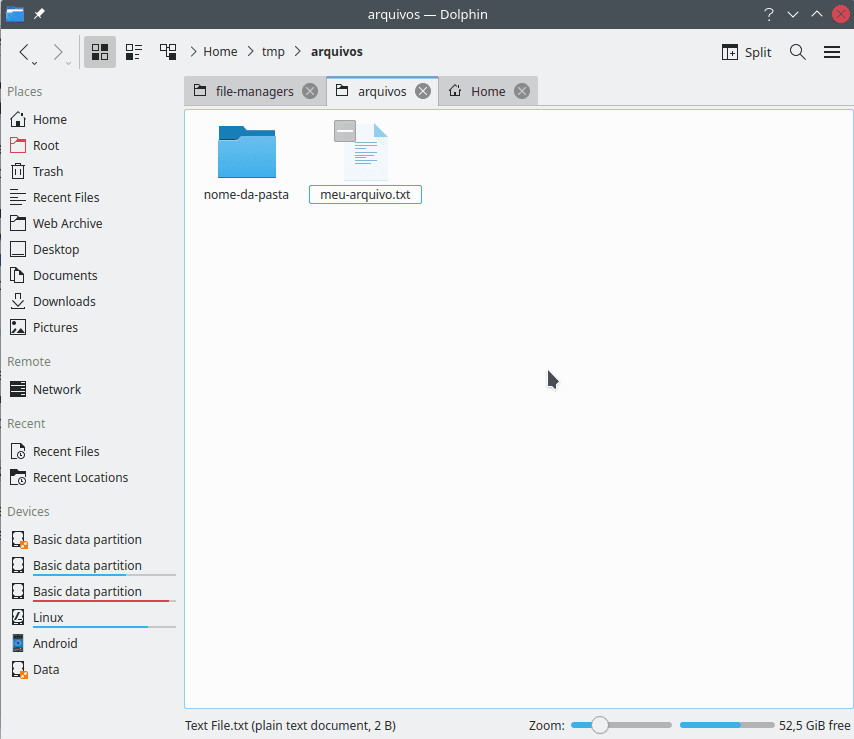
Choose a new name (
meu-arquivo.txt) for the file and pressEnterto confirm the change.![The interface to rename the chosen file with the new name (meu-arquivo.txt).]()
The resulting path for the file is
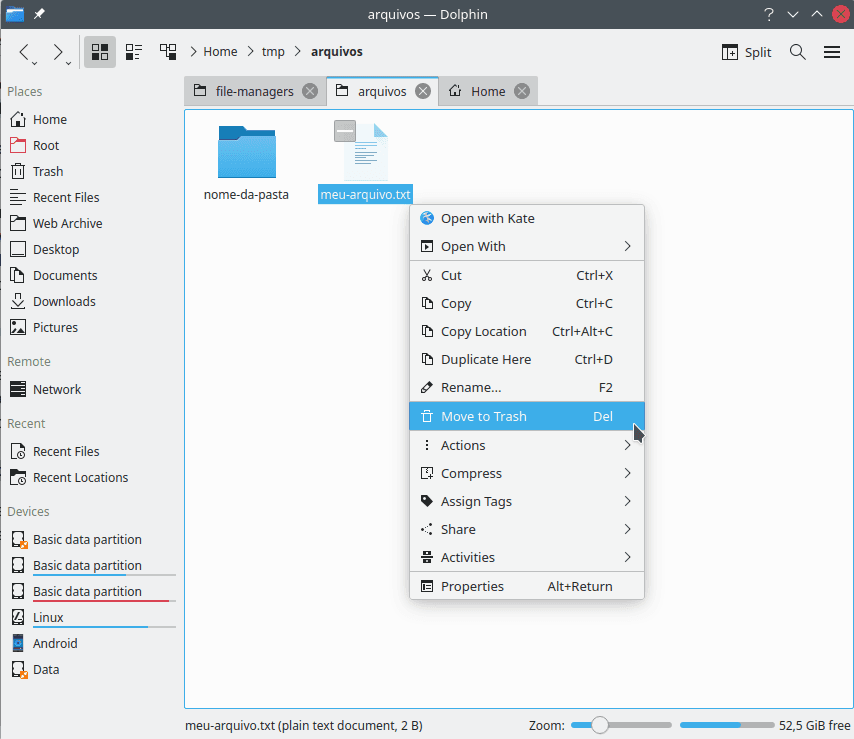
~/tmp/arquivos/meu-arquivo.txt. The relative path considering thearquivos/directory is./meu-arquivo.txt(corresponding tomeu-arquivo.txt).This time, open the context menu (with the right button) and click to delete the file, to move it to the trash (bin/can).
![The Dolphin context menu with the option move file to trash chosen.]()
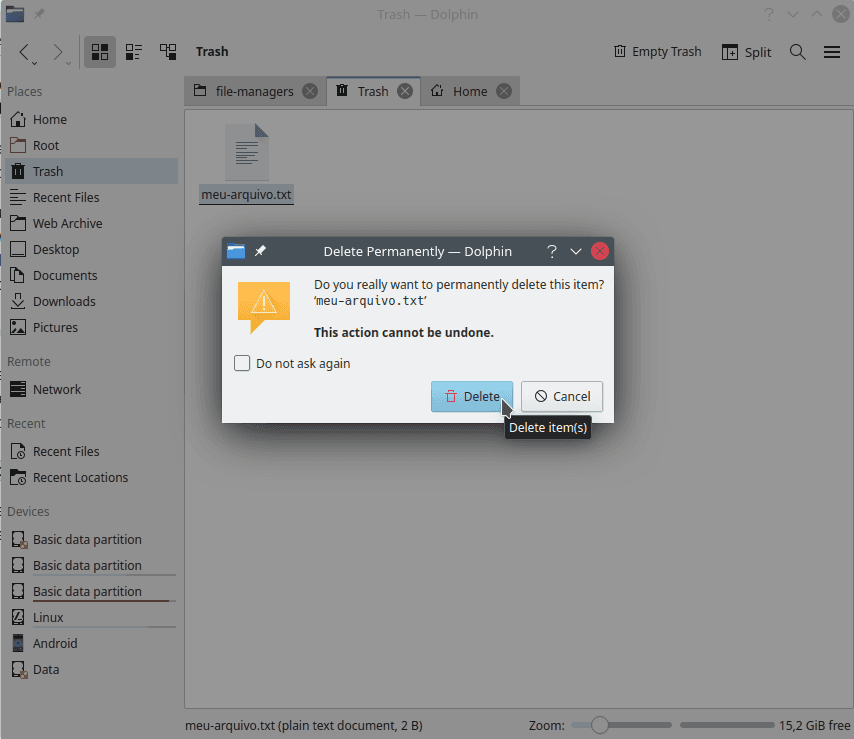
The program requests to confirm the action. Instead, cancel the deletion by clicking on cancel.
![An interface shown after trying to delete a file. It provides an alert message with two options: delete or cancel. Although delete is selected, the action will be canceled.]()
Instead of deleting, press and hold the left button. Instead of releasing it, keep the button pressed and drag it around.
Hold the button and move it over the folder. Once it is hovering there, release the button.
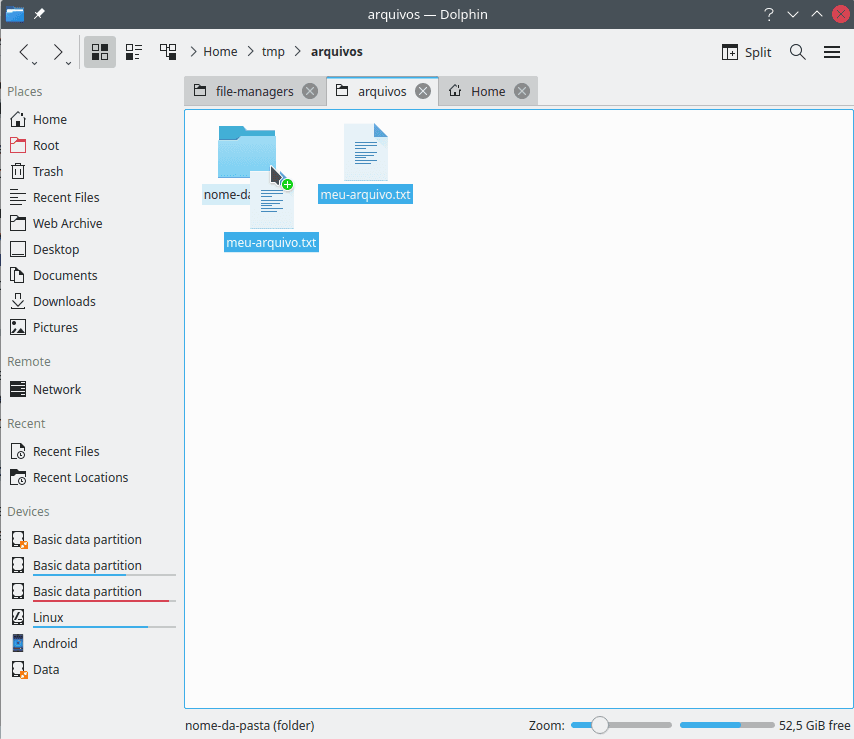
![Drag and drop operation on Dolphin. The program creates a image of the file being dragged to the destination.]()
As a result, the file is moved inside the folder. It is now stored in the subdirectory
nome-da-pasta, with path~/tmp/arquivos/nome-da-pasta/meu-arquivo.txt. The relative path to the folderarquivos/becomes./nome-da-pasta/meu-arquivo.txt(the same asnome-da-pasta/meu-arquivo.txt).![In a window split by two tabs, the original directory `arquivos` and the subfolder `nome-da-pasta` are shown. The file `meu-arquivo.txt`, now, appears the subdirectory, for it was moved there.]()
If you delete an entire folder, the files and folders stored inside it are deleted recursively. Consequently, the final state becomes the same as the starting one: an empty
arquivosfolder.![The file manager display the folder `arquivos` empty once again.]()
File Management Using the Command Line (Console or Terminal)
It is time to go back in time.
Command line interpreters (also known as consoles, terminals and shells) such as
cmd on Windows and bash, zsh e fish on Linux can appear things of the
past. If one says that command line interpreters are important tools in modern
software development, in can sound like an anachronism.
Although graphical user interfaces are more accessible and usable for many people (sighted people; accessibility depends on context), they are not often very programmable. In software development, it is common to automate repetitive tasks. After all, you should never do what a computer can do for you.
Command line interpreters enable programming with scripts, text files that store sequence of commands. Perhaps surprisingly, even a minimal knowledge can save hours or days of work over time. The reason is that, if one knows how to use the command line, it is simple to create scripts: all that is required is writing the commands in a text file and instruct the computer to run the file.
Besides, command line interpreters use text -- something that can make them suitable for people with vision disabilities, because of the potential compatibility with assistive technologies. Unfortunately, there are no guarantees of such compatibility, for there are factors that may compromise the use of screen readers and voice synthesizers, such as the formatting program outputs.
Linux (and/or Bash)
If you ever choose to learn a single command line interpreter, I would recommend
choosning the Bourne Again Shell (bash).
bash is omnipresent in Linux systems and, nowadays, it can be used in Windows with
the Windows Subsystem for Linux
or environment such as Cygwin.
One can start learning commands from the old Unix system, along with commands provided by GNU is Not Unix (GNU) Coreutils and GNU Binutils, which are all useful.
There are several ways to start a terminal session on Linux. The fastest is to
use shortcuts (read the entire paragraph before trying) Ctrl Alt F1, or `Ctrl
Alt F2, and so on, until Ctrl Alt F12. The graphical session is usually Ctrl
Alt F1 or Ctrl Alt F7. The simplest way, however, it to use a pre-installed
terminal emulator in the chosen environment (for instance, Konsole on KDE).
The command ls (list) lists files. Navigation among directories can be
performed with the command cd (change directory).
To run a command, you type its name (for instance, ls), optionally passing
parameters to it (for instance, -la) and, then, you press enter. After some
seconds, the results will appear on the screen of the terminal.
# Listing files of the root of a Linux system.
# This would be the equivalent of browsing `/` in a task manager.
ls -la /total 72
drwxr-xr-x  18 root root  4096 jun  4 22:22 .
drwxr-xr-x  18 root root  4096 jun  4 22:22 ..
lrwxrwxrwx   1 root root     7 mai 30 21:39 bin -> usr/bin
drwxr-xr-x   4 root root  4096 set 13 19:46 boot
drwxr-xr-x  21 root root  4160 set 28 06:13 dev
drwxr-xr-x  98 root root 12288 set 13 19:54 etc
drwxr-xr-x   5 root root  4096 fev  1  2020 home
lrwxrwxrwx   1 root root     7 mai 30 21:39 lib -> usr/lib
lrwxrwxrwx   1 root root     7 mai 30 21:39 lib64 -> usr/lib
drwx------   2 root root 16384 set 24  2016 lost+found
drwxr-xr-x   2 root root  4096 jan  3  2018 media
drwxr-xr-x   3 root root  4096 set 26  2016 mnt
drwxr-xr-x   7 root root  4096 jun 15 12:31 opt
dr-xr-xr-x 332 root root     0 set 28 06:13 proc
drwxr-x---   6 root root  4096 set 23 21:06 root
drwxr-xr-x  25 root root   580 set 28 06:13 run
lrwxrwxrwx   1 root root     7 mai 30 21:39 sbin -> usr/bin
drwxr-xr-x   5 root root  4096 dez 21  2017 srv
dr-xr-xr-x  13 root root     0 set 28 06:13 sys
drwxrwxrwt  14 root root   360 set 28 07:25 tmp
drwxr-xr-x  10 root root  4096 set 13 19:52 usr
drwxr-xr-x  12 root root  4096 set 13 19:54 var
The previous command is ls -la /. The remaining of the text is the result
(output) provided by the program. If you wish to compare the text with the
graphics from a task manager, the listing is the same shown in the first image
of this article, right after the title. For convenience, the image is reproduced
again below.

In bash, lines started by a hash symbol (#) are considered comments.
Comments are messages to inform people about how a script works (or to write any
message to be read by human beings); they are ignored by the interpreter.
Again, to run a command, you type the name of the command (for instance, cd),
followed, if necessary, of parameters (for instance, /usr/). Then you press
enter. The interpreter evaluates and run the command, writing the results in
the console and waits for the next command.
# Changing a directory.
cd /usr/# New listing, this time without parameters
# `ls` alone list the directories and files in the current directory
lsaarch64-linux-gnu  bin  include  lib  lib32  lib64  local  sbin  share  src
To repeat all operations that were performed using graphic interfaces, we can use the following commands:
mkdir: to create directories;touch: to create empty files;mv: to rename and move files and directories;rm: to delete files and directories.
# Change directory to the current user's personal folder
# ~ means /home/name_of_current_user
cd ~/tmp/arquivos/
# Create a folder
mkdir nome-da-pasta
# Create an empty file
# Nomes with spaces should be between quotes
# (otherwise, they needed to be escaped with special characters)
touch "Text File.txt"
# Rename text file
mv "Text File.txt" meu-aquivo.txt
# Deleting archives: commented to continue the process
# Warning: rm do not ask for confirmation before deleting the file permanently
# rm meu-aquivo.txt
# Move the text file inside the created folder
mv meu-aquivo.txt nome-da-pasta/
# Delete the folder and everything inside it (the next file)
rm -r nome-da-pasta/
With the comments removed, the previous sequence of commands is equivalent to:
cd ~/tmp/arquivos/
mkdir nome-da-pasta
touch "Text File.txt"
mv "Text File.txt" meu-arquivo.txt
mv meu-arquivo.txt nome-da-pasta/
rm -r nome-da-pasta/
The six commands do all operations previously performed on Dolphin. They have an additional advantage: it is only necessary to repeat the command to redo all actions. If one wishes to automate the process, the only requirement is saving the commands in a text file to create a script and run it whenever needed.
For more advanced scripts, there are cases on which can be useful to store the
sequence of navigated directories. In order to do this, one can use the commands
push and popd instead of cd.
Whenever you have doubts about commands, you can consult manuals and help. To do
this, there are commands as man (manual), info (information) e, often
enough, a parameter -h ou --help that can be provided to programs.
man ls
info ls
ls --help
Windows
cmd, the default Windows terminal, is rudimentary and limited if compared to
bash, zsh and others. There is a newer modern version, though
I have never used it (at least up to the date of writing this entry).
There is also PowerShell, which I have used a couple of times before.
Anyway, the usage of cmd is not too different from operating bash. The
command names are different, yet the purposes are the same.
To start a cmd session, you can type cmd in the Start menu
or use the command (with Super): ❖ r,
then type cmd and enter. There is also an esoteric shortcut: if you use
Shift Right Button, an option named Open Command Window Here
will appear at the context menu, which allows to start a
cmd session in the current directory of the File Explorer (on Windows 10,
the option was replaced with PowerShell, though it is possible to restore it to cmd -- or, simply,
type cmd ENTER in the PowerShell window).
On Windows systems, the command for listing files is called dir. The
navigation command is also called cd. Comments start with the word REM.
As with Linux terminals, to run a command, you write the name of the command
(for instance, cd), optionally followed by parameter (for
instance, C:\Users\Meu Nome\Desktop), and press enter. The result
should appear after a few seconds:
REM If this is a script, you can remove the comment of the next line
REM @echo off
REM Change directory to the starting folder
cd C:\Users\Franco\Desktop\tmp
REM Create a folder
mkdir nome-da-pasta
REM Create an empty file
REM Names with spaces must be between quotes
REM (otherwise, it will be necessary to use escape characters).
copy nul "Text File.txt"
REM Rename the text file
rename "Text File.txt" meu-arquivo.txt
REM Deleting archives: commented to continue the process
REM Warning: del do not ask for confirmation before deleting the file permanently
REM del meu-arquivo.txt
REM Move the text file inside the created folder
move meu-arquivo.txt nome-da-pasta\
REM rmdir asks confirmation to remove a directory
REM To disable the confirmation, you can use the parameter /R
rmdir /S -r nome-da-pasta\
If you have questions about command usage, you can run the help with
help command-name.
help rmdirBesides the differences of the command names and the word for comments, there is
also the suggested usage of echo at the start. The default behavior of cmd
is to repeat all typed commands in a script. @echo off turns off the feature,
reducing the noise (unnecessary text, in this case) in the terminal output.
Another difference is the direction of slashes in paths of files and
directories. As previously mentioned, Unix-based systems use forward slashes;
Windows use backslashes. On recent version of Windows, many commands provide
correct results with a forward slashes, though there are no guarantees that it works
for every single one. There exists other ways to use
forward slashes on cmd, such as not starting the path with a bar. Anyway,
if results are incorrect (or empty, when they should exist) on Windows, it can
be worth to check the direction of slashes.

